Showing posts with label create. Show all posts

Thursday, July 5, 2012

Staycation all I ever wanted...

I hope you all had a wonderful 4th of July yesterday! We went to Dayton to spend the day with my family. It was relaxing and pool filled and overall just wonderful. I hope that you celebrated America's birthday in a similar fashion.

Tomorrow is my last day of work, and then comes my amazing staycation. Every time I think about my staycation next week, I hear this in my head:


I've never had a staycation before, and I can't wait. I usually take the week between Christmas and New Year's off, which is wonderful for spending time with family and friends, but negative wonderful for getting any projects done. 

I have been day dreaming about this glorious week ever since I found out it was going to happen. I have so. many. projects that I just can't wait to tackle!

Here are a few of the things I'm thinking about doing:


Making homemade laundry detergent. This recipe is for an HE version. My friend makes it and swears by it, and it's soooo much cheaper than buying it!


Monogrammed throw pillows for our bed. Once I make these, I think our bedroom is officially finished!


I bought the fabric to make this skirt two years ago. It's about time I actually do it.


This hat is made out of an old t-shirt. I have all the supplies to make this too - just need to do it!

I'm also planning to visit a friend, have lunch with my mom, clean, clean some more, finish organizing my sewing room, find some new curtains for our dining room, exercise, prepare for my new job, read a few books, and oh yes, relax.

I guess I probably won't get to everything, but hopefully I'll get to a good chunk. Any other ideas for things I should tackle?? If you've ever had a staycation, let me know if you have any advice for how to make the best of it!

Wednesday, June 6, 2012

Knock Off Anthro Letters

Our decorating projects are always a compromise and collaboration. It usually starts with me having an idea, Zac throwing in his two cents, and then us settling on a design or idea that's a mix of both. It usually works out well for us, and we end up liking our compromise idea better than either original.

The cool thing about planning a bedroom remodel is that every night as we laid in bed we ended up brainstorming ideas. You might remember that our bedroom has two closets. One night, Zac suggested that we add some cool letters above the closets that said "his" and "hers." To be honest, I wasn't on board at first. No one goes into these closets but us, and we know whose is whose.

The idea started to grow on me, though. I looked up getting the metal letters from Antropologie.... but $18 a piece? Yikes. It was time to go all DIY on this project.


We started with these paper mache letters from Hobby Lobby. At $2.47 a pop, they were a steal. We went with the paper mache version because they were thicker and stand off from the wall a little bit, plus we liked the font. They had flatter wood letters also.

We took a gamble on the Krylon metallic spray paint - we weren't sure how it was actually going to look on the letters. The verdict? What else in my house can be spray painted metallic???


Beautiful, and not even close to finished. We did one coat on each letter and made sure to get the sides, but that's it. We went inside thinking it would need a second coat later, but when we saw this we knew we would be fine.


Isn't that spray paint amazing? It must have other uses in my house - anything that isn't as shiny metal as I want it to be!

We took the letters upstairs and attached them to the wall with poster gum. They are really light, and there wasn't a good way to use nails to hang them. I did have a flashback to being in 8th grade and using poster gum to hang N*SYNC posters on my walls. Oh, the memories.


Here's a close up of my letters. Can you tell they aren't metal? The light even reflects the way it would if they were really metal.


Zac's letters.


Here's a shot of them over my closet.... 


and over Zac's. I love the textured element the silver adds to our greyish/blue and white color scheme. They look fantastic, and they've been up for two weeks and haven't fallen down yet. You've gotta love that poster gum.

What do you think? Would you be fooled into thinking they are the real deal? And most importantly, what else can I spray with the metallic spray paint??

Click HERE to see the blog parties where I'm linking!

Thursday, May 17, 2012

Holiday Helping Hands

Last fall, my friend Clare asked if I would help a class with a service learning project. Clare has a really cool job - she works for a foundation and is in charge of pretty much all service learning projects in our city. If you aren't familiar with service learning, it is a teaching and learning strategy that integrates meaningful community service with instruction and reflection to enrich the learning experience, teach civic responsibility, and strengthen communities.


I worked with students at Arlington Heights Academy. This is a sort of last chance high school for a lot of kids. Many of them have struggled at other schools for various reasons, but here they have an incredibly supportive teacher who truly loves them as individuals. She seeks out unique learning opportunities for them that set them up for success.


And, each December, they execute an event called Holiday Helping Hands. These students, many of whom come from severely disadvantaged backgrounds, donate various items from around their house to fill a secret santa like store. They create a literal wonderland in their school and invite hundreds of kindergartners to experience holiday magic. They create reading and math activities that teach the students while they have fun. It's a truly magical experience for both the older kids and younger ones.


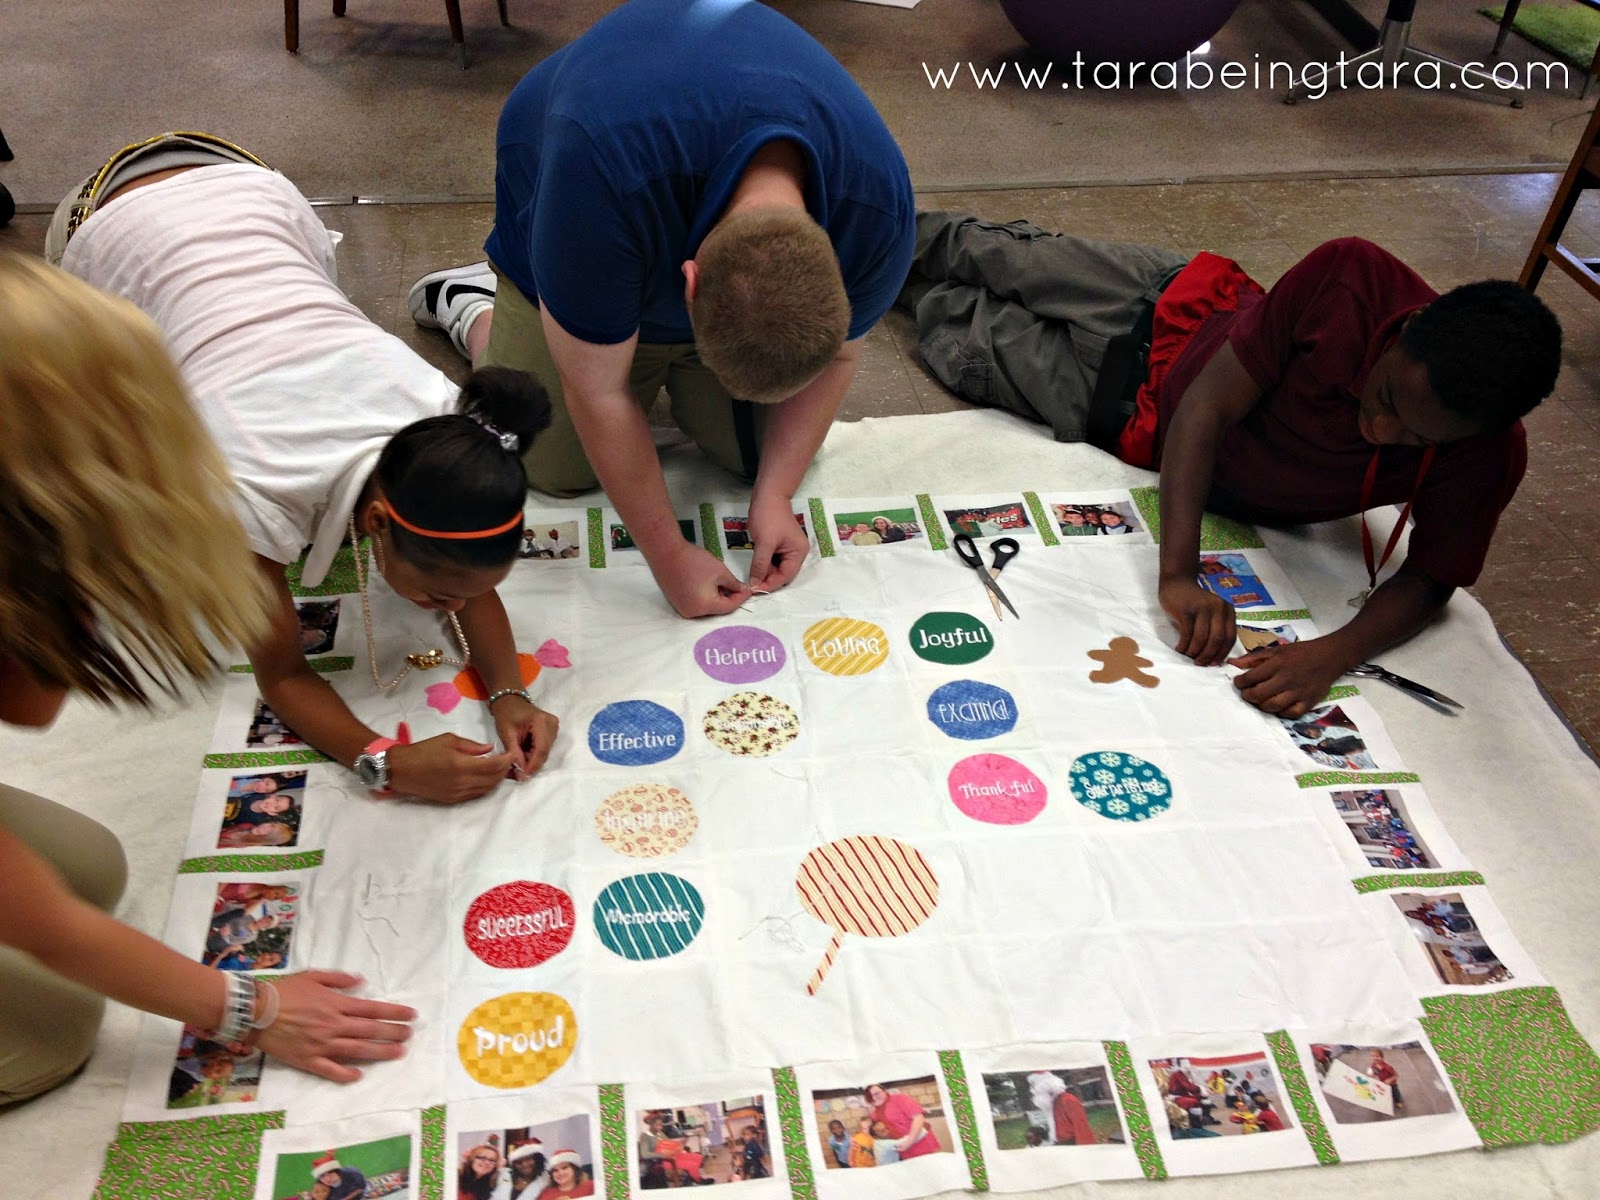
My role was to help them make a quilt hat would reflect what they learned from the experience. My first visit was last fall, where I taught the students about quilting and helped them create a design. The students came up with exactly what they wanted - my only role was to make sure it was "do-able."


The students decided that they wanted a picture border around the outside, so they also chose pictures to go around the edges.


When I came back the second time, I had printed the photos onto photo transfer paper. The students cut out the pictures and ironed them on to white fabric squares. I was so surprised... they loved it!


Another part of their design was creating twelve circles that simulated a Candy Land board, one of their main decorating themes. Each circle had a word that described their service learning experiences.


They traced the shapes onto wonder under paper and then chose the fabrics they wanted to use. 


I took their work home and tried to turn it into their original design. I brought it back to school for them to tie together. I thought about quilting it for them, but I wanted to give the students as many opportunities to touch the quilt - literally and figuratively.


How cute are these high schoolers? Many of them are just freshmen.


I still need to add the binding -- but here's where we are now.

I'm really grateful for the opportunity to work with these students. Is the design my favorite of all time? Probably not. Is any single part of it straight? Nope - many hands don't make straight quilts. But it darn well might be one of the most beautiful I've ever seen.

Tuesday, January 17, 2012

A flowery baby quilt

Zac's cousin and his wife had a baby in September, and the whole family was thrilled when they found out the baby was a girl. Zac comes from a family of lots of boys, so Maddelyn is the first girl in a long time.

It was fun to make a girl quilt for a change, but I didn't want it to be too girly. Erin told me that they were planning a nursery with red accents that would be super pink, and when I saw this fabric, I knew it was perfect.

Maddelyn's older brother received one of the very first quilts I ever made. This is another favorite - it just turned out so cute!

I should point out that is my gramma's couch, not mine. No offense, Gramma. It's a nice couch!


I gave you a sneak peak of this baby quilt a few months ago, but I forgot to take pictures of it before I gave it away! Thankfully, I stole a few pictures when we saw them over the holiday.

Here's the quilt in progress at my gramma's house in the fall:


And here it is finished!


It looks really busy in this picture, but it isn't as crazy in person!

This gives you an idea of the size.


The back is a dot minky that is so soft. And you can see how pretty the quilting is!


I only quilted in the nine-patch squares, and left the flowers free. It made for a beautiful quilting design on the back of the quilt, too!

I found the idea in a book, but there's really no pattern. The nine-patch squares are made from jelly roll (2.5") strips, which makes cutting them a breeze. They are 2.5"x2.5" squares, and the flowers are appliqued on 6" squares.

This is one of my favorite quilts I've ever made... it was hard to give away. Hopefully Maddelyn loves it as much as I loved making it!

Click HERE to see the blog parties where I'm linking!

Monday, January 9, 2012

Pallet Art, or, I am an Artiste

There are so many awesome pallet projects floating around the internet. Bookshelves, wine racks, art pieces... they're everywhere. I happened to mention this to my neighbor who is a landscaper, and he brought me home my very own pallet! Thanks, Bob!

It sat on our driveway for a few weeks while we (I. Zac was negative interested, because since it was wood, he knew it was going to be major work for him!) tried to figure out what project we wanted to make. We narrowed it down to two finalists:


This gorgeous coffee table

                                 Pinned Image

This cool art piece.

Ultimately, the art piece won out because caster wheels cost a zillion dollars, Zac was pretty sure the coffee table would be too big for our living room, and we had a large space in the family room where we needed an art piece anyway. Score.

The cost for this project is:

Pallet - $0
Paint - $0 (already had it)
Round sponge brushes ($2.99. Bought the cheap set. Worked like a champ. Score).

Yeah, the whole freaking thing cost $2.99. Because we are super awesome like that. And we have well connected neighbors.

This was the best kind of joint project because we each had to do our parts while the other person wasn't home for various reasons. That meant Zac got to cut the pallet and build the "canvas" without me saying things like, "Are you sure it should be that long?" "What if you turn it the other way?" "Can I use the saw?"

It also meant that I got to paint without hearing things like, "That red is too dark." "Add another line over there." "Are you sure you want to include that many flowers?"

Ahh sweet marital bliss.

Anyway, the pictures are a bit crazy because I found out mid-project that Zac had taken our good camera to a football game. So instead of great pictures of me painting, you can see pictures like this:

Go CATS!

But anyway... the first step in this process was for Zac to cut the pallet and turn it into a canvas.


He took the boards off of the pallet... and how much do you love that we do projects like this in our living room, without even rolling up the rug? We are hard core.

This is how he put them together...

And this is what it looks like finished!

He did a fantastic job - all of the boards line up perfectly. We didn't sand it at all - we wanted that rough look and feel to it. A few of the boards were more rough than others, and the brown paint pen I used for the branches probably won't ever be used again, but it was worth it.

Time to bring out my trusty paint supplies. Thank you, Alpha Gamma Delta, for making me do enough crafting to accumulate this supply. I really should use this stuff more often!


I followed this tutorial here, which was really helpful. The project itself was so simple. It took me a while (3 hours, probably?) but that was because my cheap brush pack only had one circle brush of each size so I had to clean them off and could only do one color at a time.

The tutorial was inspired by this World Market art piece, and I liked how there were more colors and flowers than the tutorial, so I modeled mine off of the original art.

                                               Pinned Image

The first step was to draw branches onto the pallet. At first, I followed her picture almost exactly because I was afraid to mess up. You can't really mess this one up. As I went on, I started to just draw some crazy lines.


Then, I started with the bursts. I did one color at a time, and honestly chose the colors as I went along. I put in the colors until I had enough big bursts, then went through and added the smaller bursts one at a time.


The finished product:


And here it is hanging in our living room. The colors tie in really well with our pillows. It is so perfect in the room - I'm not sure how we ever lived without it!


And a picture so you can see it with the throw pillows. 


The best part is when people come over, they almost always notice it and want to know where we got it. Oh, you know, I just made it. No big deal!

Click HERE to see the blog parties where I'm linking!

Tuesday, January 3, 2012

Oh the places you've been...

In order to fully appreciate this post, you need to know a few things about my family.  Specifically, you need to become familiar with all the places we've lived.

I was born in New York. We moved to Minnesota just before my second birthday. Both my sisters were born there, and when I was in Kindergarten, we moved to North Carolina. Nine months later (seriously), we moved to the Upper Peninsula of Michigan, where we lived until I was in 8th grade. I started high school in Dayton, Ohio, which is where my parents still live.

Tired yet? I've also since lived in Kentucky and Cincinnati, so I've got the most states of anyone, but we all have a lot! I should add that we were not military; my dad works for a paper company. Go figure.

Okay, so you already know that I'm completely addicted to Pinterest (follow me here!). I was browsing one day and came across this:

             Pinned Image

How cute is that? I love the visual representation of the different places you've lived, and it didn't seem that hard to make (thanks to the great tutorial).

It was really pretty simple. I used the font recommended in the tutorial and printed out the state outlines. I printed them directly onto card stock, and they looked great. I punched the holes directly with my sewing needle, and then used a full strand of embroidery floss to do the stitching.

One tip - don't punch your holes too close together, or pull your stitches too tightly. If you do, you might get halfway through a Michigan and have to start over when it rips!

Here's the version I made for my mom and dad for Christmas:


I couldn't find a five opening frame, but I found this six opening one at Michael's and thought the double matting was a nice touch. The house is just my addition to fill the space.


Here's a close up so you can see the stitching. I think it adds a nice dimension in real life. The tutorial says to use felt to make the hearts, but I found these babies at JoAnn's for $0.99 for a pack of three, and it was way easier than trying to cut out teeny tiny hearts. They were a lot sturdier too, and went on easily with my hot glue gun. With zero burns. Craft winning.

I also made this version for my brother-in-law and his wife. They're the world travelers, and at the end of their Grand Adventure they'll be moving to New York City. Their version has Kentucky, London, and New York.


Overall, I think they turned out really well. My mom, who is well known for her non-emotionness and inability to get teary eyed regardless of the situation, sure looks like she likes it!


Have any of you lived in as many states as we have? This is also a great conversation starter when someone comes over for dinner! 

Click HERE to see the blog parties where I'm linking!

Monday, January 2, 2012

My New Year's Resolutions

My resolutions for 2012 are a lot like last year - a mix of resolutions and goals. I did better than I thought in 2011, but I still have so many wishes and hopes for 2012 that it's hard to narrow it down to a manageable list. Am I the only person who has about a billion goals right now? As evidenced by your comments on this post, I'm not, so I'll console myself with that.

So, without further ado, my list of resolutions for this new year. Excuse the random pictures - this is a painful amount of words and I tried to make it more fun for you.

1. Try to "have it all," but don't go crazy when I can't. I can't stop my crazy quest for a perfect life - it would basically be against my (insane) nature. What I can do is let it roll off my back when things can't be perfect. Any suggestions for how to actually do this would be greatly appreciated by me (and my husband who will bear the brunt of it if I can't pull this one off). My mood/stress level affects our relationship so much, and I'm not going to let it do so negatively this year as much as I can help it.

2. Schedule a monthly date night. Zac and I have promised each other that we'll have a monthly date night in 2012. Since we're still kid-less, we get plenty of time alone together, but we tend to fall into a routine and forget to schedule "special" time. Zac's planning the odd months and I'll plan the even months. Doesn't have to be anything fancy, but it will be fun to focus on each other a little bit more in 2012.


Us at a restaurant. In Paris. Which is unlikely to be one of our monthly date nights this year.

3. Stick to an exercise routine. Like everyone else in the entire world, I have this goal for 2012. Derby and I are starting our third week of Couch to 5K this week, and so far, so good. It helps to have a (dog) accountability partner, and the exercise is as good for him as it is for me. I also found a cool app that speaks the intervals to you so you don't have to stalk your watch, and I stream NPR while I run. Don't knock it until you try it - it's like someone's telling you an interesting story the whole time you're running but you don't have to talk back. The real struggle here will be fitting it in when life gets busy again in January. But I'm going to do it - I have to do it.

                             Pinned Image
Damn, Pinterest. Why you gotta be so dead on right and mean sometimes?

4. Make enough time for my hobbies. When I get busy, I get tired, and then I get stressed. I also tend to neglect the things that relax me when I need them the most, and I want to get away from that this year. Vegging out in front of the TV has its place, but I've wasted way too many hours doing that in 2011. Sewing and reading are my two biggest priorities here... and I'm setting a goal of doing both, for at least a little while, at least once a week. Nothing crazy, but I need to make this a priority. This also includes another quilting visit to my gramma in NY. 

                                        
This won't really be me. We have electricity. But you get the point.

5. Stick with our budget. Now that we've got our finances on track, sticking with our budget is a lot easier, because new clothes and an occasional Starbucks treat are built into it. The next stage for us is adding more cushion to our savings account and watching as things like new cars, vacations, and large home projects become a reality. This isn't a hard goal at all -- I freaking love this one!

                                                        
Me with all our budgeted money. Holla!!

6. Stay present. My new boss is a huge fan of meditation and mindfulness, and I'm so excited to learn more about this from her. I spend a lot of time thinking about things that have already happened, and an embarrassing amount of time worrying about things in the future. I need to focus on being present in the moment, not worrying about things unless they need to be worried about, and staying calm and un-frustrated. Easier said than done, but do-able.

                                                       Pinned Image

7. Stay organized. When I feel organized, I feel better. Period. I'm a pretty organized person, but there are always things I can do to help with this. Picking up a few things each night so our house stays clean, taking time at the beginning and end of each day to plan for the next, packing my lunch the night before, and re-evaluating each month to see what I can improve.

8. Take a vacation. We don't have the logistics of this one worked out completely yet, but I want us to take a real vacation (ie: not just visit family) sometime this year. I don't want the year to get away from us without ever making this a priority. And I desperately want to go back to our honeymoon spot. Not sure yet if that's do-able, but I'm willing to eat Ramen noodles for three months to make it so!

                               Pinned Image

9. Stick with my blog. This wasn't a great posting year for me, but re-discovering this blog over the past month has felt great. I really do love documenting our lives, and I love the community it brings me from all of you. So thank you for reading, and I'll do a better job this year of keeping this bad boy updated (who am I kidding? This blog is obviously a girl). If I don't follow your blog, leave me a comment so I can start!

That's my not-so-small list of things to focus on in 2012. This year, I'm going to actually remember to look at it more than once between now and the end of the year. Is there anything else I should include? 
Thursday, December 8, 2011

A very OSU Baby Shower

I mentioned here that we threw an Ohio State themed baby shower for Erika, which was tough for someone like me who is most definitely NOT an Ohio State fan! In fact, as I was making Erika's gift, the following conversation actually happened:

Zac: "Mark and Erika are Ohio State fans?"
Me: "Yes, you know that. Erika is from Columbus."
Zac: "That sucks. I really like them."
Me: "You know we can still be friends with them, right?"

Sheesh. Boys are crazy.

I forgot my camera for the shower (must have been everything else I was packing to take with me!) but I stole some pictures from my friend Whitney to show you the spread. We went with a strictly desserts shower.

Another Pinterest inspired craft, these sweet streamers  were easy to make and were oh so cute.


I just noticed my face in the background. What am I crazy surprised about?? I guess it will remain one of the world's great mysteries.

A picture of the spread. Mini fruit pizzas on sugar cookies (thanks, Pinterest!), buckeyes, and red velvet cupcakes.


Strawberries filled with cheesecake filling and dipped in graham crackers. They were really yummy, but would be better in the summer when strawberries are sweeter.


Whitney brought these cookies. Aren't they adorable??


And what Ohio State shower would be complete without buckeyes as favors? I ate about 30 over the next week. So bad, but oh so good.


Us with the sweet mama to be:


I made this appliqued onesie and bib to fit the theme.


The onesie was inspired by Pinterest (shocking, I know), and is just simple applique. It was a quick project because the letters don't have a lot of curves! For the bib, I traced a bib I had (that I keep for tracing, not because I have random bibs placed throughout my house) onto white terrycloth, appliqued the shapes on the front, and then made binding and finished it like a quilt. Which was a huge mistake because it took forever and I had to do most of it by hand. This is definitely where bias tape would be helpful in the future. The closure is just sew on white velcro.

It took everything in me not to add ruffles to the legs of that onesie, because of course, I've known this baby was a girl from the very beginning.  And guess what?


Sweet Anna Lee Robbe was born on December 1st. I should have added those ruffles!!


She is unbelievably sweet. What a pretty baby. I wanted to make sure she had something pink, so I made her this hat using this awesome free pattern. I have been hooked on crocheting lately. This hat took about two hours - it was super fast and turned out so cute! 

Congrats Mark and Erika on having the sweetest little girl. They had to pry her out of my arms. And I've already made her two more hats. I need to get a life. Or work on getting my husband ready for babies of our own?

You might also like...

Related Posts Plugin for WordPress, Blogger...